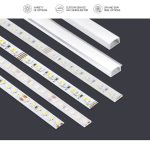
LED Light Strips: Where to Cut for a Perfect Fit
LED light strips have become increasingly popular in recent years due to their versatility and convenience. They can be used for a variety of purposes, including decorative lighting, task lighting, and even as a primary light source in some cases. One of the most appealing features of LED light strips is their flexibility, which allows them to be easily cut to fit any space. However, knowing where to cut can be a daunting task for those who are unfamiliar with the process. In this article, we will explore the best places to cut LED light strips to achieve a perfect fit, as well as some tips and tricks to ensure a seamless installation. When it comes to cutting LED light strips, precision is key. A poorly executed cut can not only ruin the aesthetic of the lighting but can also render the strip useless. It is essential to have a clear understanding of where to cut and how to do it properly. Fortunately, with a little bit of knowledge and practice, anyone can achieve a perfect fit. In the following sections, we will discuss the different places where LED light strips can be cut and provide step-by-step instructions on how to do it correctly. So, whether you are looking to install LED light strips in your home or office, you can rest assured that you will be able to achieve a flawless installation.
Understanding LED Light Strips

LED light strips are a popular lighting solution that can be used for a variety of purposes. They are flexible, easy to install, and come in a range of colors and brightness levels. LED light strips are made up of small LED bulbs that are attached to a flexible circuit board. They are powered by a small transformer that plugs into a wall outlet. LED light strips are ideal for use in a variety of applications, including under-cabinet lighting, accent lighting, and task lighting. One of the great things about LED light strips is that they can be cut to fit any size or shape. This makes them a versatile lighting solution that can be used in a wide range of applications. To cut LED light strips, you need to first determine where to make the cut. Most LED light strips come with cutting marks every few inches. You can use a pair of scissors or a sharp knife to cut the strip along these marks. Once you have cut the strip to the desired size, you can attach it to your surface using the adhesive backing. Overall, LED light strips are a versatile and easy-to-use lighting solution that can add a touch of ambiance and style to any space.
LED light strips are an excellent way to add a stylish and modern touch to any space. These strips consist of multiple small LED bulbs that are connected together and powered by a driver. Each bulb emits a bright and energy-efficient light that can be easily customized to fit any mood or occasion. The strips themselves are typically made of flexible materials like silicone or plastic, which makes them easy to cut and shape to fit any surface. Additionally, most LED light strips come with adhesive backing, which allows users to easily stick them onto walls, cabinets, or any other surface. Overall, LED light strips are a versatile and cost-effective way to enhance the ambiance of any room.
Measuring for a Perfect Fit
Getting the perfect fit when cutting LED light strips is crucial to ensure an aesthetically pleasing and functional installation. Measuring correctly before cutting can save you from making any costly mistakes. The first step is to determine the length of the surface where you want to install the LED light strips. Use a measuring tape to get an accurate measurement of the area. Ensure that you take into account any corners or turns that the light strip will need to navigate around. When measuring, it’s crucial to be precise and avoid any estimation. If the measurement is off, it can lead to a poorly installed light strip that may not fit or function correctly. Once you’ve taken the accurate measurements, it’s time to cut the LED light strip to the correct length. Before cutting, ensure that you double-check the measurements and mark the cutting point on the strip. You can use a sharp pair of scissors or a razor blade to cut the strip. It’s essential to make a clean cut to avoid damaging the strip. If you’re unsure about cutting the strip, it’s recommended to seek the advice of a professional. Cutting the strip too short or too long can leave you with a useless strip that won’t fit your desired surface. Taking the time to measure and cut correctly can save you a lot of time and money in the long run.
When it comes to cutting LED light strips, precision is key. To ensure a perfect fit, it’s important to measure and mark where to cut the strip before making any cuts. The first step is to determine where you want to place the strip and measure the length needed. Once you have the measurement, use a ruler or tape measure to mark the exact spot where the cut needs to be made. It’s important to use a sharp pair of scissors or a utility knife to make the cut as clean as possible, ensuring that the strip will fit perfectly in its designated spot. By following these step-by-step instructions, you’ll be able to cut LED light strips with ease and achieve a flawless result every time.
Cutting LED Light Strips

LED light strips are an excellent way to add some ambiance to any room in your home. However, sometimes you may need to cut them to fit a specific space. Cutting LED light strips is a relatively easy process, but it requires some basic knowledge and tools. One of the most important things to keep in mind is that you can’t just cut them anywhere. There are specific places where you can cut LED light strips without damaging them. A good rule of thumb is to look for the designated cut points, which are often marked by small scissors or a dotted line. These cut points are where the strip can be safely cut without damaging any of the LEDs. When cutting LED light strips, it’s essential to have the right tools. A sharp pair of scissors or a box cutter will do the trick. It’s important to make sure you’re cutting in a straight line to avoid any jagged edges that could cause the strip to malfunction. After you’ve made your cut, you may need to reattach the power source to the newly cut end. This is a simple process that involves connecting the wires from the power source to the cut end of the strip. With a little bit of care and attention, cutting LED light strips can be a straightforward and rewarding process that allows you to create a custom lighting solution for your home.
When it comes to cutting LED light strips to the desired length, it’s essential to have the right tools and methods to achieve a precise cut. One of the best tools for this task is a pair of sharp scissors or a utility knife. A ruler or a measuring tape can also be helpful in ensuring accurate measurements before cutting. It’s important to note that LED light strips should be cut only at designated cut points, which are often marked with a scissor or saw icon. Additionally, it’s crucial to handle the strips carefully and avoid cutting through any of the copper contacts or circuits. With the right tools and techniques, cutting LED light strips can be a simple and efficient process that helps to ensure a perfect fit for any project.
Installing Cut LED Light Strips
LED light strips are a versatile and attractive way to add a touch of ambiance and style to any space. However, in order to achieve the perfect fit for your specific area, it may be necessary to cut the strips to size. Installing cut LED light strips is an easy process that can be done with just a few simple tools. To begin, measure the area where you want to install the LED light strips and mark the desired length on the strip itself. Next, use a pair of sharp scissors or a craft knife to carefully cut along the marked line. It is important to be precise when cutting, as any mistakes may result in the LED light strip not functioning properly. Once the strip is cut to the correct size, it can be attached to the surface using the adhesive backing or mounting brackets that come with the kit. With a little bit of effort, you can create a stunning and customized lighting effect in any room of your home. Overall, installing cut LED light strips is a simple and rewarding process that can elevate the overall aesthetic of your space. Whether you are looking to add a warm glow to a cozy reading nook or a colorful accent to a party atmosphere, LED light strips provide a versatile and affordable solution. With a little bit of planning and care, you can create a custom lighting design that perfectly fits your individual style and needs. So why wait? Get started on your LED light strip installation today and enjoy the benefits of beautiful and functional lighting in your home or office.
Installing cut LED light strips can be a great way to add some ambiance to your home or business. First, you’ll need to measure the length of the area where you want to install the strips and cut the LED light strip to fit. Next, determine where you want to mount the strips and clean the surface thoroughly. There are a variety of mounting options available, including adhesive backing, mounting clips, or aluminum channels. Once you have mounted the strips, connect the wiring to a power source using a transformer or driver. It’s important to follow the manufacturer’s instructions carefully to avoid damaging the strips or creating a safety hazard. With a little patience and attention to detail, you can enjoy the warm glow of LED light strips in any room.
LED light strips have become increasingly popular in recent years due to their versatility and ease of installation. However, cutting and installing these strips can be a daunting task, especially for those who are unfamiliar with the process. To ensure a perfect fit, it is important to measure the space where the strip will be installed and cut the strip accordingly. It is also crucial to use the right tools, such as a sharp pair of scissors or a utility knife, to avoid damaging the strip. Additionally, it is recommended to use a solderless connector or a strip-to-strip connector to join multiple strips together. Finally, it is important to clean the surface where the strip will be installed and allow it to dry completely before applying the adhesive backing, which will ensure a secure and long-lasting hold. By following these key points and tips, anyone can easily cut and install LED light strips for a flawless and professional-looking finish.
Conclusion
In conclusion, LED light strips are a versatile and popular lighting solution that can be easily cut to fit any space. However, it is important to know where to cut to ensure a perfect fit and avoid damaging the strip. By following the manufacturer’s instructions and using the proper tools, anyone can achieve a seamless and professional-looking installation. Whether used for accent lighting or as a primary light source, LED light strips are a great way to enhance any space with their energy efficiency, low profile, and customizable features.


