Guide for how to paint walls of your garage
Painting walls on a garage is an extremely simple task that all of us can complete without any help. Keep in mind that this process is time-consuming so you will need at least 2 days or more. You need basic tools and items, something we will explain below.
Items you will need:
Before you start, make sure you have all of the following items ready. It is annoying when you have to go in the middle of a process to find some simple item that is so important that you can’t continue working without it. The items you will need are:
- Broom
- Cleaner for all areas
- Spackle
- Masking tape
- Paper towels
- Latex primer
- Putty knife
- Paintbrush
- Latex paint (amount for all 4 walls)
- Painters tray
- Roller for paint
As you can see all of these items are cheap and they can be easily found in your local store. The amount of paint you will need depends on the size of a garage. A paint bucket will display the suitable area it can cover so make your calculations and make sure you have more than enough.
The filler you will need if you have dents and holes in the walls. Simply apply filler, let it dry for 30 minutes, sand it and you are ready to start painting it. This step is extremely important if you want to get the desired effect. Once you have repaired all the damages to the walls you can move to the next step. See our repair and maintenance section.
First preparations
Now you need to mask the floor, remove the switches and the ventilation elements. You can use masking tape and old clothing to protect the floor. Paint and primer will reach it without a protection meaning you will have to invest hours and hours into removing the paint. Simply protect the floor and secure all the parts with masking tape. You can use literally any old material you have in your house.
If you don’t want to remove the switches and sockets, use masking tape to protect them. Keep in mind that all the surfaces must be protected in order to make sure they won’t be accidentally painted.
Clean your garage
Now you will have to clean your garage. This refers to the walls and floors. Remove all the dust, debris, spider web and anything else that will make painting impossible. Here you can start with a broom and make sure to remove larger debris first. Then use a vacuum cleaner and clean the surfaces additionally. It is a simple task that can be completed within minutes.
We must add that adding water to the walls or to remove stains is not a good option. Water can make some areas softer than usual and change the hue of the paint in the end. You can sand those stains which is a much better option.
There is no need to add that all items should be removed from a garage. You don’t want to accidentally paint them and have to remove that paint afterward. Place them inside a house of the backyard and you will be fine.
Repair the wall damages
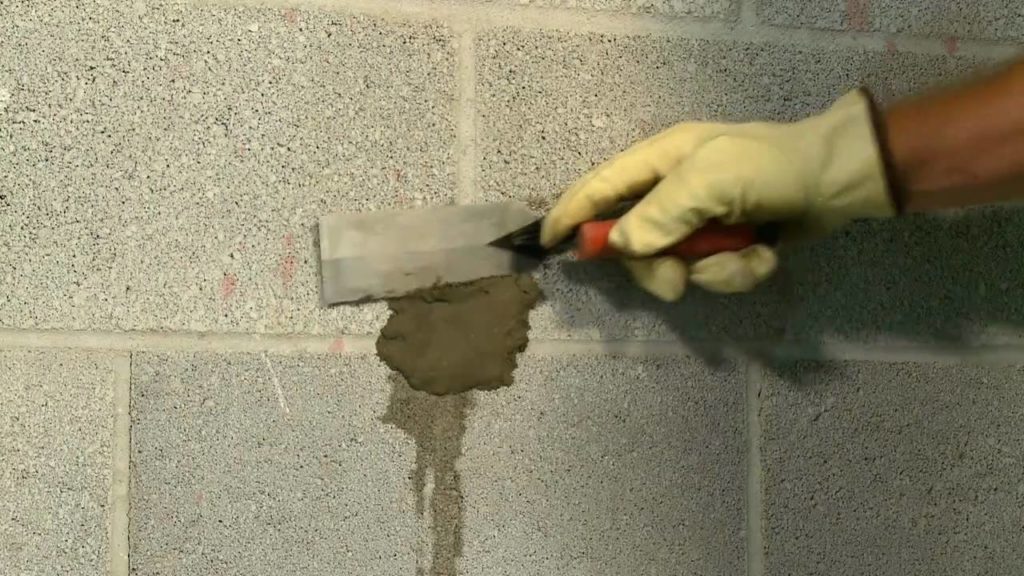
You can see that each wall has damage or two. Use masking tape to protect the surface around the damage, sand it and use filler to flat the surface. Once the filler is dry, use sandpaper to make it even and you are done.
All the dents and damages should be fixed. Those damages will be seen even after you apply 2 coats of paint. Paint can’t cover them and even if the crack is covered, it will soon be visible. The main mission here is to make all the walls even and suitable for painting.
We can also tell you that if your garage is made from cinder blocks you need a different filler. Drywall fillers (see also: Drywall Anchors for DIY: The Definitive Guide (2019)) are different and they are a bit flexible. The best thing to do is to determine the material of your garage and then choose a suitable filler. You will need one or two small packages.
Apply primer
The first, actual step for painting is to apply the primer. Keep in mind that only one coat of primer is needed. It must be on the same base as the paint you will use later on. Here you can see two main alternatives. The first one is a regular primer and the second is a stain-blocking one. The second primer is designed to be used when the walls are covered with massive stains which will be visible after painting. Using this primer will make the surface ready to be painted professionally.
Once you are done with the primer, let it dry perfectly. You won’t be able to paint while the primer is wet and you will encounter issues and problems. Paint may even fell form the walls, literally.
Most primers are available in white and gray colors but you can find a primer that is darker in hue. This is needed if you want to paint the garage walls in darker colors. If you are choosing white paint, then a white primer is the best. In a nutshell, the primer should be matched in color with the main paint. Once you are done and the primer is completely dry, you can move to the next step.
Start painting
Here is the most desirable step of them all. Now you are ready to start painting. Always get a high-end paint for your garage. Cheap and low-end paints can’t cover stains or damages to the walls and they usually start cracking after a short period of time. High-end latex paint should have syrup texture and should be denser than ordinary paint.
You will use roller wet with paint to apply it to the walls in V shape. Overlap the areas and create a unique surface. Then you will use the brush to reach the corners and small areas that are inaccessible for the roller. Apply one coat of paint on all the walls and surfaces and let it dry. This can take up to 24 hours, depending on the paint and the conditions. Make sure to read the instructions on the paint to get the better idea.
In most cases, you will need two coats of paint to get the desired effect. Once again, a layer of paint must be completely dry before applying the second one. Never paint wet paint.
Soon you will get the desired color and your garage will start looking perfect. It is something you wanted to create and something you will enjoy even more, now when the fruits of your labor are visible.
The last thing to do is to remove all the masking tape from the floor and the surface and install back the switches, sockets and the vents. You are done and now you can enjoy, finally.
Conclusion
Painting the walls of your garage is time-consuming, yet simple task you don’t need to hire professionals for. Be free to experiment and try to complete the task all by yourself. With this guide, you will manage to get the desired effect without any complications.

